XMP Metadata Files
The metadata or XMP files contain information about the images that can be used to replace the image EXIF information or to re-use the alignment configuration. They can be helpful when setting up a camera rig, where the camera positions won't be changed.
Export XMP files
You can export the XMP files using either the button or the button, both available in the Export section of the ALIGNMENT tab.
The button opens the XMP metadata export dialog:
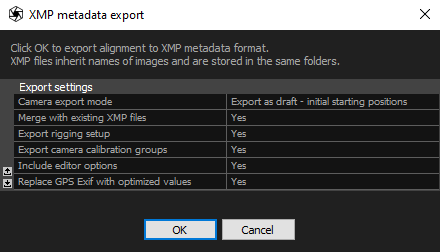
- Camera export mode Specify the camera position and how they are going to be used in the further calculations.
- Export as draft The draft export option utilizes absolute camera positions, but they are subject to adjustment during the alignment process.
- Export as exact Choosing the exact export option ensures that the cameras maintain their relative positions. This option is suitable when preserving the spatial relationships between cameras is crucial.
- Export as locked The locked export option combines the preservation of both relative and absolute camera positions. Unlike the draft export, the positions remain fixed and are not adjusted during the alignment phase.
- Merge with existing XMP files Creating new XMP files for the same images will result in the replacement of existing ones.
- Export rigging setup Enable to export the rig setup information when using the laser scans. If disabled, only the position and orientation information will be exported.
- Export camera calibration groups Export the information about the calibration groups. More about the calibration groups here.
- Include editor options Enabling this option signifies that the images are enabled for texturing and meshing processes. This information can be found in the Selected input panel.
- Replace GPS Exif with optimized values Use the coordinates calculated during the alignment instead of the EXIF coordinates.
The button opens the file explorer window and to export XMP files, set the saving type to RealityScan XMP (exact priors, absolute coordinates) and press the button. This will take you to the Export Registratoin dialog:
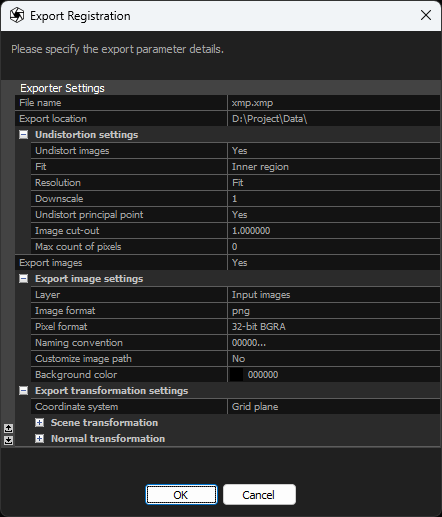
- File name File name set in the file explorer window is irrelevant to the XMP file export. The file created with this name will remain empty.
- Export location Path to the selected directory where the exported files will be stored.
- Undistortion settings Adjust the undistortion parameters applied to the data exported in the XMP files.
- Undistort images Enable (set to Yes) to export values corresponding to the undistorted images.
- Fit Specifies the portion of the undistorted image to include in the output.
- Resolution Sets the image resolution. Selecting Fit or Preserve enables the Downscale settings, while choosing Custom provides options to set Custom width and Custom height.
- Downscale Specify the downscale factor for the undistorted images in the XMP export.
- Custom width Specify a custom width for the undistorted images in the XMP export.
- Custom height Specify a custom height for the undistorted images in the XMP export.
- Undistort principal point Adjust the position of the undistorted image center. Set to Yes to align the optical center with the actual center of the exported image.
- Image cut-out Specify the fraction of the image to be used for undistortion in the XMP export.
- Max count of pixels Set the maximum resolution for the image in pixels. Use zero (0) for no limit.
- Export images Enable this setting to export together images with the XMP files.
- Export images settings Adjust the undistortion parameters applied to the data exported in the XMP files.
- Image format Format in which images are going to be exported.
- Pixel format Select the pixel format for the exported images: 24-bit BGR, 32-bit BGRA, or 64-bit RGBA.
- Naming convention Choose the naming convention for the exported images.
- Customize image path Enable this setting if you want to customize the path (directory) where images will be exported.
- Image path Set the path (directory) where the images will be exported.
- Background color Select the background color of the exported images.
- Export images settings Adjust the undistortion parameters applied to the data exported in the XMP files.
- Coordinate system Choose coordinate system in XMP metadata will be exported.
- Scene transformation Apply transformation value to change scene's positions, rotate it and scale it.
- Normal transformation Apply transformation settings to the normal vectors.