Mesh Classification
Classifying means to divide the vertices of the model into classes. This step is necessary to create a Digital Terrain Model, which can be generated during the creation of orthographic projection. Classification tool can be found in the Tools section of the SCENE 3D/TOOLS tab. After choosing the Classification tool, the Classification Tool panel will appear:
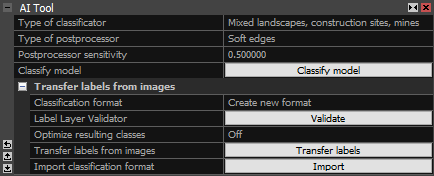
- Type of classificator Choose the type of the classificator based on the nature of the scene that is being classified.
- Type of postprocessor Set the type of the postprocessor that will execute a process after classification to clean the model. In most cases option Soft edges is sufficient.
- Postprocessor sensitivity This value can only be set for type of postprocessor except for "None". It can be set to a value between 0 and 1. If set to 0, everything will be set as "Artificial object", and if set to 1, everything will be a Ground class.
- Classify model Run classification using the above mentioned settings.
- Transfer labels from images Classification can also be done by transfering labels layer imagers directly on the mesh vertices.
Selected Classification
The created classification can be found in the 1Ds view under the model that was classified, under the Model Classes. Once you select the created classification and/or its classes, you can find more details in the Selected Classification tables.
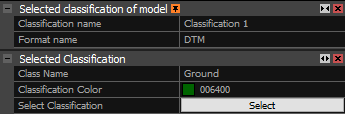
- Classification name The name of the created classification. You can rename it here.
- Format name The type of created classes. When using AI tool, the format name is DTM with predefined classes - Ground, Artificial Object, None and Ignored. When transferring labels from images, you can create custom formats with your own classes.
- Class Name The name of the class in the selected classification.
- Classification Color The example of the color used to represent the class and the Hex color code.
- Select Classification Selects all parts of the model that are assigned to the selected class.
Edit Classification
Classification can be manually edited by clicking on the class you want to edit, under the desired classification in the 1Ds view, and selecting the part of the model (i.e. with the Lasso tool from the section Model & Texture in the SCENE 3D/TOOLS tab) that will be reassigned to another layer. After the selection is executed, an Override classification button will appear. By overriding the selected part of the model, it will be reassigned to the selected layer of the classification.

Classification can be also edited automatically by selecting the part of the model, that is to be edited and running the classification again
with different settings. This method is usable when there are different types of terrain in the model.
After classification is complete and it is established that some parts of the modelcan be improved upon with different settings, open the Classification tool,
change the settings, and choose . RealityScan will reclassify the selected part of the model.

Transfer Classification
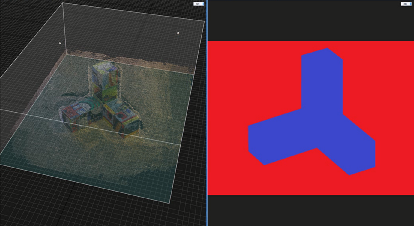
It is possible to classify your model using previously label layer images or LiDAR classes. You can divide objects in images into color-based classes or transfer existing ASPRS LiDAR classes such as ground, vegetation, or buildings to create a new model classification. Up to 250 classes can be used per dataset.
Creating a new classification using label layer images does not require every image to be labeled. A few labeled images are enough, as long as all areas that need to be separated and classified are covered. Read more about image layers here.
After importing label layer images or LiDAR scans with their own classification, create a model to enable the Classification tool in the SCENE 3D/TOOLS tab. Press the button to open the Classification Tool panel, where the Transfer labels from images sub-panel is available.
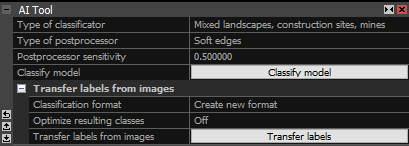
- Classification format Define the format of the new transferred classification, where each class is represented by a color and an assigned name. If you choose an existing format, the names from that format will be applied to matching colors in the new classification. To transfer LiDAR classification to the model, set this option to LAS ASPRS Classification.
- Label layer validator Check the validity of the label layer images. Available only when the label layer images have been imported correctly.
- Optimize resulting classes Use built in optimization algorithm to fine-tune the resulting classification according to the structure of a model.
- Transfer labels from images Transfer labels from the label layer images or from the LiDAR classification if the LAS ASPRS Classification classification format was selected.
- Import classification format Import a previously exported classfication format.
- Export classification format Export the currently selected classification format.
The created classification appears in the 1Ds view under the classified model, within Model Classes. After selecting a specific class, more details can be viewed in the Selected Class panel.
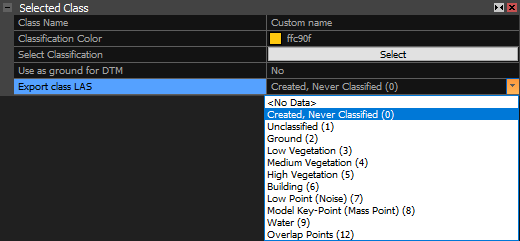
- Class name The name of the class in the selected classification. You can rename it here.
- Classification Color The example of the color used to represent the class and the Hex color code.
- Select Classification Selects all parts of the model that are assigned to the selected class.
- Use as ground for DTM Treat this class as "Ground" when calculating digital terrain model.
- Export class LAS Set a classification code for exporting to LAS format. Classification codes are defined by the American Society for Photogrammetry and Remote Sensing (ASPRS) for LAS 1.3 format (more info here).
It is possible to edit the classes in the same way as any other classification created in RealityScan. Please check the section Edit Classification above.