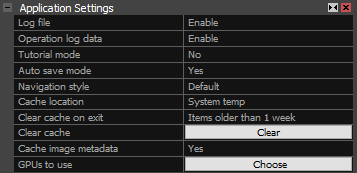
Application Settings
Open the application settings in the part of the Workflow tab.
Rendering Settings
Change the number of points (mesh vertices) and model triangles that can be displayed in the 3Ds view.

- Max points to display The maximal amount of a point able to be rendered in the 3Ds view. The more points you set, the denser but slower render you get.
- Max triangles to display (Max GPU memory) Choose how much of the GPU memory should be used for rendering. This determines the number of triangles that will be displayed. There are three settings, with options to use 20%, 40% (default), or 80% of your VRAM. It will say how many triangles can be displayed next to each setting based on the VRAM of your machine.
Visual and Language Settings
Use these settings to change the application's visual style and UI language.
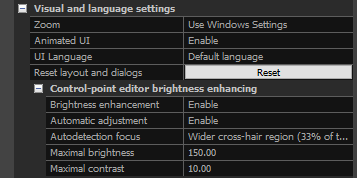
- Zoom Change the size of all user interface elements (texts, panels, windows), except for ribbons.
- Animated UI Enable or disable fading of the application windows in and out of visibility.
- UI language Switch to a different language to be used in the whole application, including Help.
- Reset layout and dialogs Click the button to reset the user interface to its default state.
Control-point editor brightness enhancing
Change the settings used to enhance the image brightness and contrast when placing control points.
- Brightness enhancement Enable the brightness and contrast enhancement during the placing of a control point.
- Automatic adjustment Enable the automatic adjustments based on the visible area of an image.
- Autodetection focus Choose the area that is going to be used for the automatic adjustment.
- Maximal brightness change Defines by how much brightness can change. Shows up when the Automatic adjustment is enabled.
- Maximal contrast Set the maximal contrast that can be displayed. Shows up when the Automatic adjustment is enabled.
- Brightness Set brightness to a constant value. Shows up when the Automatic adjustment is disabled.
- Contrast Set contrast to a constant value. Shows up when the Automatic adjustment is disabled.
Import and Export Settings
These settings are applied when importing inputs or saving a project.
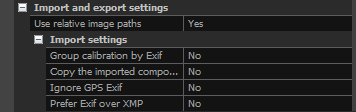
Use relative image paths When enabled (set to Yes), the input paths in the project file (.rsproj) will be saved with relative paths.
Group calibration by exif To group camera parameters automatically using EXIF data, when images are added to a project, set this parameter to Yes. More about grouping here.
Copy imported components to cache Set to Yes in case your cache is located on an SSD disk, and you want to speed up the access to components.
Ignore exif GPS If an image includes GPS coordinates in the EXIF, you can globally turn on/off their use here. Alternatively, you may do it in the sensorsdb.xml per camera.
Prefer Exif over XMP When importing new files, Exif metadata takes priority over XMP metadata if this setting is enabled.
Coordinate Systems
RealityScan can work with multiple coordinate systems at once, e.g., each control point can be measured w.r.t. a different coordinate system. Here, you can change the project and the output coordinate system.

Project coordinate system A reference coordinate system, click here.
Output coordinate system for export in a different coordinate system. More information here.
Progress End Notification
When a process has ended, you can define an immediate follow-up action using these settings.

Minimal process duration Set a minimal duration after which RealityScan will execute the notification task. This value is in seconds. For practical reasons, this value should be greater than 60.
Action Choose one of these for the program to be carried out after the time set above lapses: none / play a sound / execute a program. When choosing to Execute a program, a user may also define command-line parameters (for example, an error message, duration, process type, RealityScan setting, scene name), which will call an external program.
For example:
Write the following sequence of commands into a field Command-line process in the settings panel:
Create "post-op.bat" file that contains commands to write the process result into a file named with the current date and time:
cd %~dp0
echo %1>"RS_%date:~-4,4%%date:~-8,2%%date:~-12,2%_%time:~0,2%%time:~3,2%%time:~6,2%.log"
%date:~-4,4% are the last four characters of the current date (the year).
%date:~-8,2% are the eighth and seventh characters from the right side (the month).
%date:~-12,2% are the twelfth and eleventh characters from the right side (the day).
The same principle applies for the time as well.
The format of the date and time depends on the Windows region and language settings. To check the format, please execute in a command prompt window the following commands:
echo %DATE%
echo %TIME%
After the process (with Minimal process duration) is complete, a file RS_date_time.log is created with the result of a process in the form:
Screen Grabber
RealityScan integrates a documentation system, which allows you to record a video during your workflow. The screen grabber captures the window area and stores it on a disk with quality, resolution, and frame rate defined below. The system automatically recognizes whether a time-consuming process is running. Then, the screen grabber automatically reduces the capturing and speeds it up so that every process appears in the final video at maximum 8 seconds long, regardless of how long it really took. You do not need to worry about hours of non-changing videos.
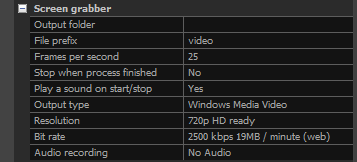
- Output folder for documents created by the screen grabber tool. See also this short tutorial: Video Screen Grabber.
- File prefix of the videos made by the screen grabber.
- Frames per second Set the number.
- Stop when process finished When set to 'Yes', the screen grabber will stop recording with the process completion.
- Play sound on start/stop Set to 'Yes' when you want to be notified about the start/end of the screen recording.
- Output type These are the possible options to choose from: frames as JPG/PNG, a Windows Media Video, or an mp4 video.
- Resolution SVGA 800x600 / 720p HD ready / 1080p Full HD / 4k / window size.
- Bit rate 256/400/700/1500/2500/4000 kbps or 40/80 mbps. For more details, expand the pull-out menu in this line of the Application Settings panel.
- Audio recording Include audio recording from the default audio source to your video. Choose from: No Audio / Normal Quality (96 kbps) / YouTube Quality (128 kbps) / Pop-star Quality (160 kbps).
Real-time assistance
Set the connection availability for the Real-time Assistance tool and toggle processing notifications

- Enable Internet proxy Allow data to be sent over the Internet when a local connection is unavailable.
- Process start and end notification Display notifications in the notification area when a process starts or finishes.
Epic Games account
Sign out of your account in RealityScan or sign in to one if you skipped the sign-in process.

- Signed in as The active Epic Games account currently signed in. If sign-in is skipped, it does not display a specific user.
- Sign out Sign out of RealityScan.
- Sign in with Epic Games In case you skipped the sign-in, this option will be visible, enabling you to later log in to your Epic Games account.
Global Settings
You can export and import the global settings of the application here.

Export global settings Click the button to export the global settings of the application to .rcconfig file.
Import global settings Click the button to import the global settings of the application from .rcconfig file.
See also:
- Learn about Auto Save Mode click here
- More about the application cache click here
- More about grouping of camera parameters click here
- More information on coordinate systems click here
- Learn how to use the screen grabber click here